Exploring Cresta’s Effective Strategies and Tools in Front-End Development
In this article, we’re going to take a close look at Cresta’s front-end (FE) architecture. We’ll discuss how the main FE repository is structured, explain our build and deployment processes, and describe our approach to code generation. Read on for insights into our front-end development process.
Introduction
For the past two years, I have been part of Cresta’s innovative and versatile engineering team. At Cresta, we embrace a collaborative approach, with our team members contributing from various locations worldwide, including San Francisco and Berlin.
Cresta, a Series-C-funded company, is at the forefront of transforming call center operations. To gain a deeper insight into our groundbreaking work, I recommend visiting our website. We primarily focus on three core products:
- Real-time Agent Assist: This Electron-based application enhances call center agents’ daily workflows.
- Insights: Our web application delivers crucial analytics, addressing key questions for call centers and aiding strategic decisions.
- Coaching: A web tool designed to empower call center supervisors in optimizing agent performance.
This article will focus on the front-end development practices behind ‘Insights’ and ‘Coaching’. These products share a common codebase and deployment method. Over the last two years, I have contributed to both products and the general health of our codebase. My role has encompassed a diverse range of responsibilities, from developing key features and products to pioneering our automated end-to-end (E2E) testing strategy.
Repository and development setup
Our ‘Insights’ and ‘Coaching’ web applications live within a unified repository known as “Director”. Using React for our front-end development, we’ve structured this codebase as a multi-package repository to leverage modularity and improve maintainability. Our structure includes:
- director-app: this package is the hub of our user interface and experience design, encapsulating all UI/UX aspects for both applications.
- director-api: It handles the execution of API requests and serves as the translation layer, converting data from API models into the customized models we use in our front-end. For defining our inter-service APIs and generating TypeScript API definitions, we rely on Google’s Protocol Buffers.
Multi-package Repository with Lerna
The top-level architecture of our repository is organized as follows:
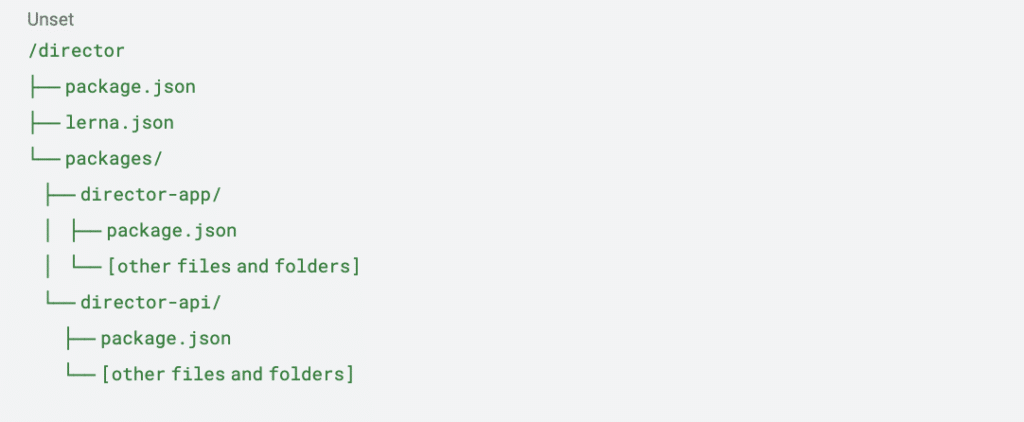
Each package within our Node.js ecosystem is using TypeScript to ensure type safety and enhance development workflow. Initially coming from 5 different packages we refactored it into these two packages. For managing this multi-package setup, we utilize Lerna, a powerful tool that optimizes the management of multiple packages with shared dependencies within a single repository.
At the heart of our project, the /director/package.json file plays an important role in orchestrating our development workflow. This file is structured as follows:
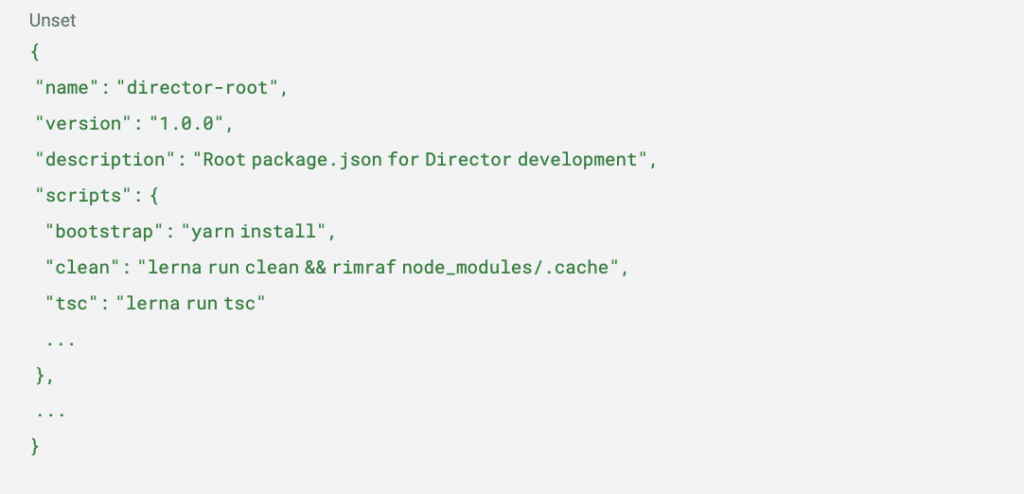
Running any lerna command in /director will trigger the requested action in the different packages.
Goodbye Babel! Hello Vite and SWC
Our development speed has seen a significant boost since we switched our front-end build tool from Babel to Vite. One of the key benefits of Vite is its ‘Instant Server Start’, which allows our dev server to launch immediately. This change has also reduced our build time dramatically, from 5 minutes down to just 40 seconds. To better understand the distribution of memory space across modules, we use the rollup-plugin-visualizer for visualizing our final build.
In addition, replacing Babel with SWC for our Jest test suite has improved efficiency. Test run times have been cut from over 5 minutes to 40 seconds, enhancing our overall testing process.
Key Building Blocks for Director
- Component Library: We chose Mantine for its user-friendly interface and supportive community on Discord.
- Charting Library: Highcharts is our go-to for most charting needs, proving it’s worth through the simplicity to use. However, for complex charts Highcharts is not enough. Here, we turned to D3, which offers flexibility and power.
- Table component: TanStack Table is our choice for table implementations. By wrapping it in our own component, we’ve added default styles and functionalities such as pagination.
- API calls: For managing interactions with backend (BE) APIs, we use TanStack Query. Its key advantage is efficient caching. When API call parameters don’t change, TanStack Query smartly avoids making redundant requests. This feature not only streamlines our front-end to back-end communication but also boosts performance. The library also offers a straightforward approach to cache invalidation, further simplifying our API management
- Form Management: We utilize React Hook Form as our main solution for form development and custom validation rules. My personal experience with this library has been positive, notably in terms of speeding up form development once I grasped its concept. However, it’s worth noting that opinions on React Hook Form vary within our team. For instance, a colleague faced challenges in maintaining type safety while creating reusable and complex form fields. Due to these mixed experiences, we’re considering exploring other options like TanStack Form, which might offer a different approach that could align better with our needs.
- State-management: Our initial approach to state management involved using Apollo’s global state and its ‘client state’, which eventually became unmanageable. To address this, we initially shifted to prop drilling, but found it to be quite cumbersome in complex component hierarchies. For simpler scenarios, we’ve employed React Context. However, for more robust and intricate state management needs, we’ve recently started using zustand, which offers a more effective solution.
- eslint-plugin-react-hooks is key in our code for ensuring useMemo and useCallback are used correctly. It helps us detect any missing dependencies, preventing potential issues and optimizing performance.
Infrastructure & Development Lifecycle
Branching Strategy
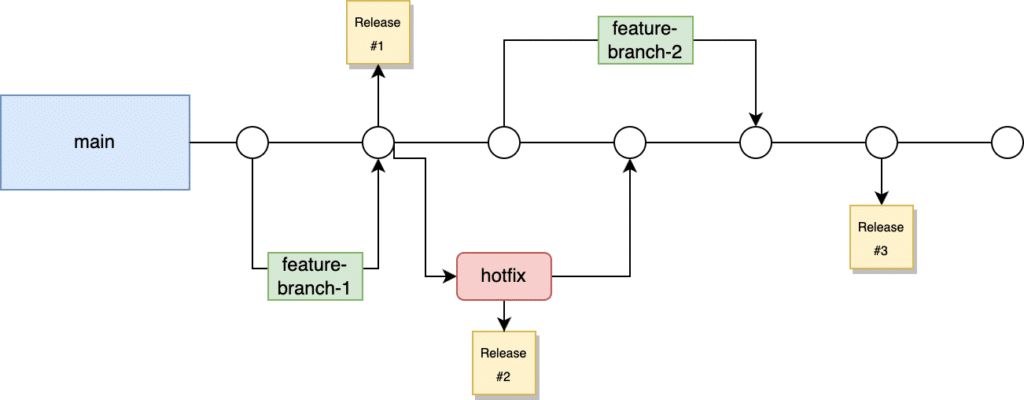
Overview of our branching strategy
The main branch is the core of our development process. It’s where all new features start and where our code is constantly updated. Here’s how our process works:
All new features are based on the main branch. This ensures that new work is always built on the most up-to-date and stable version of our code.
Pull Requests (PRs): To merge a feature into main, two key requirements must be met:
- Peer Review: Each PR needs at least two approvals from our team. This step checks for code quality and consistency.
- GitHub Actions: All automated checks in our GitHub workflow, such as build, linting, and unit tests, must pass. This confirms that the new code works well with the existing code and meets our quality standards.
Our front-end updates go live every week. This is done by creating a GitHub release that tags the latest commit on main, starting the process of moving this update to our live production environment.
For urgent fixes, we create a new branch from the most recent production release, not from main. This is important because main might have changes that aren’t in production yet. Branching from the latest release ensures that hotfixes are based on what’s currently live, keeping our production environment stable.
Deployment Strategy
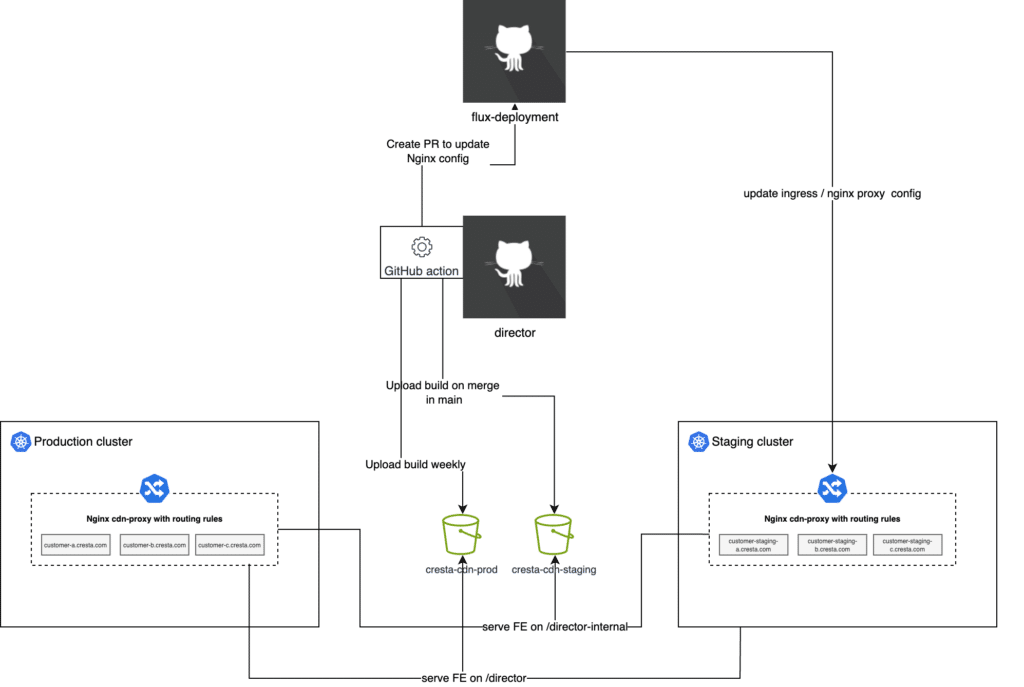
Overview of our deployment strategy
Our deployment strategy involves four key components:
- Director Repository: Houses our FE code.
- Flux-Deployments Repository: Manages our Kubernetes cluster configurations.
- Staging and Production Kubernetes Clusters: Includes a CDN-proxy for handling web traffic.
- S3 Buckets: Separate buckets for staging and production environments.
The Deployment Process can be summarized in the following steps:
Step 1: Creating the FE Build:
- Upon each merge into the main branch, a GitHub workflow compiles our TypeScript code, runs linting, and executes the FE unit tests.
- Successful builds are uploaded to the staging CDN bucket, following the naming pattern internal-main-<commit-ID>, making them accessible at the /director-internal URL.
- For weekly releases or hotfixes, a similar process is followed but with the production CDN bucket, using a naming pattern like prod-main-<commit-ID>.
Step 2&3: Creating a PR and Propagating Changes:
- Once a feature PR is merged into the main branch of the director repository, or a release is created, an automated process triggers the creation of a pull request in the flux-deployments repository to update the CDN proxy configuration.
- The CDN proxy is an Nginx proxy, and its configuration is essential for routing to the correct version of the FE application.
- Here’s an example of a configuration snippet in a HelmRelease file:
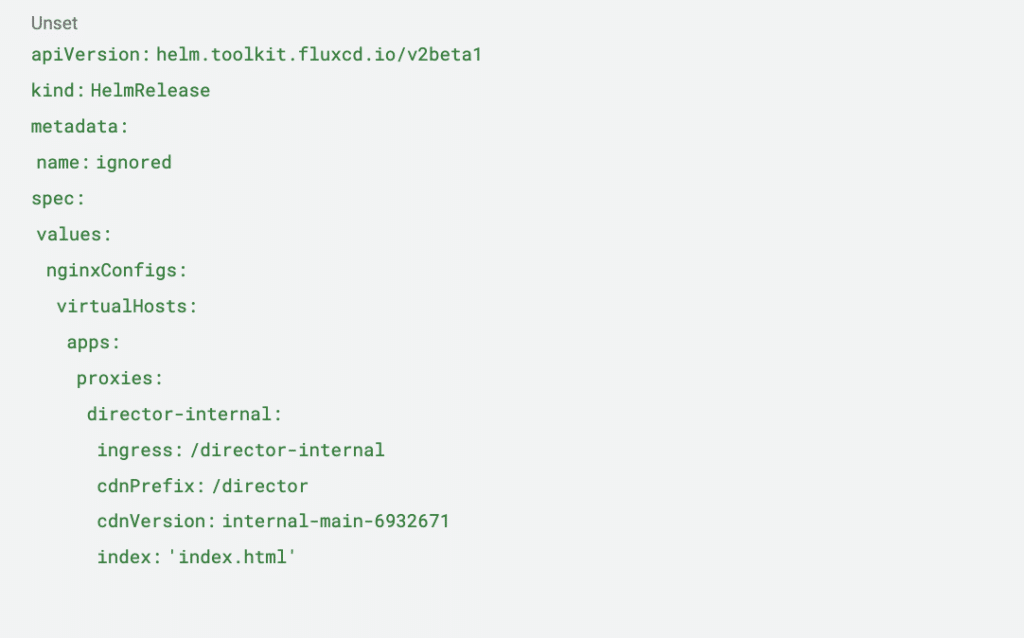
- This HelmRelease, a Flux custom resource definition (CRD), shows the config of our proxy. It specifies the version of the FE application that the CDN proxy should serve. The key line to update in the PR is cdnVersion, which matches the pattern from Step 1.
- Once this PR is merged, the changes are automatically applied to the CDN proxy in our Kubernetes clusters.
Step 4: CDN proxy as Ingress
- The CDN proxy also functions as ingress within our Kubernetes cluster.
- It’s responsible for delivering the content of our FE web application to customers.
- The Kubernetes resource definition of for the CDN proxy as ingress is defined as follows:
![]()
- This Ingress resource defines how traffic is routed to our FE application for each customer subdomain.
In summary: we deploy our FE from two locations: /director for public release, updated weekly, and /director-internal for internal testing, updated with each commit to the main branch.
Preview Your Feature Using Proxy Override Before Merging:
- If you need to test your feature in the staging or production environment before merging it, you can use the CDN version and override the frontend director version. This can be achieved by setting a cookie in your browser. Our CDN proxy will use this cookie to deliver the specified FE version, enabling you to test your PR in a live environment prior to merging it into the main branch.
What happens On Commit
For every commit we make in the director repository, we leverage pre-commit to automate a series of tasks. Originally, we had a Python back-end as well in our repository, hence we rely on pre-commit. However, since it is now a pure FE repository, we would probably integrate something like husky.
Here’s a glimpse of our pre-commit configuration:
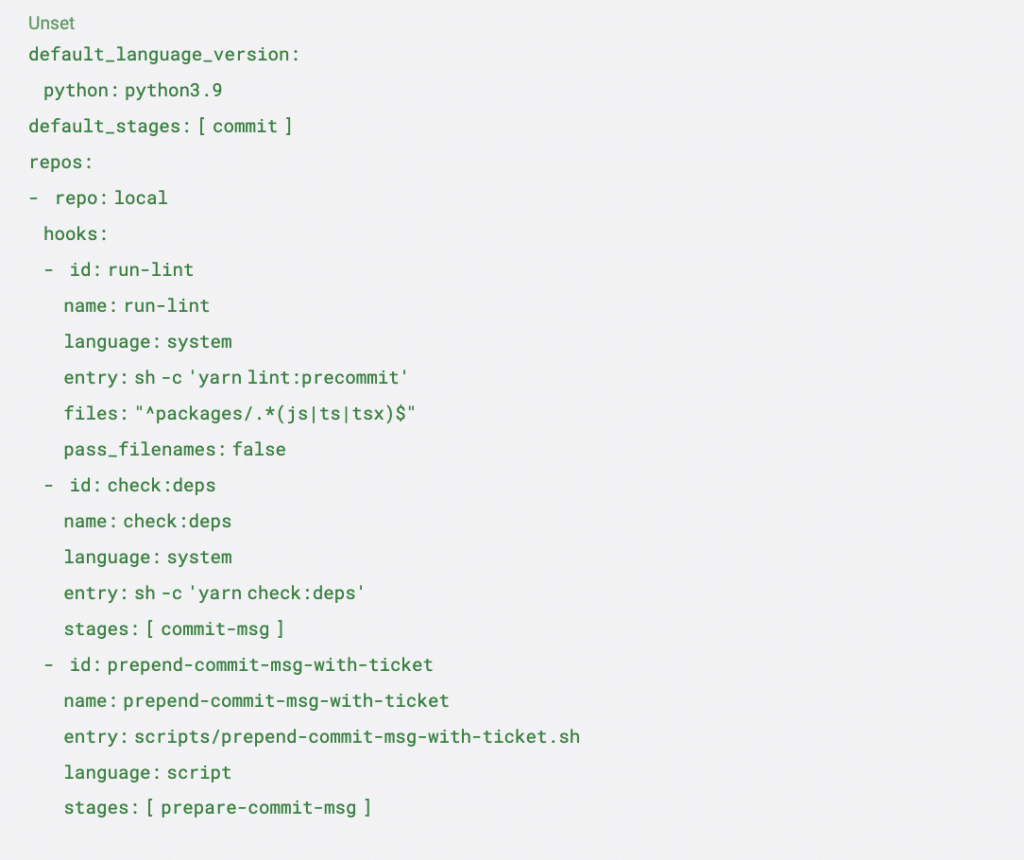
When we commit locally, three key tasks are executed:
1: Linting Changed Files:
- We use eslint to lint only the changed files. Additionally, we run unimported to check for any unused files.
- The command yarn lint:precommit is triggered, which uses git diff to find changed file names and then applies eslint to those files. Our eslint setup also includes running prettier.
2: Checking for Cyclic Dependencies:
- We run the custom command yarn check:deps to look for any cyclic dependencies using madge.
- If any cyclic dependencies are found, the commit process is stopped.
3: Appending Linear Ticket Number to Commit Messages:
- A script, prepend-commit-msg-with-ticket.sh, is executed to prepend the Linear ticket number to each commit message.
- This aids in tracking the purpose of each commit. For example, a commit message like “my new feature” becomes “[DIRP-983] my new feature”.
- The ticket number, such as ‘DIRP-983’, corresponds to the Linear ticket and serves to link the PR directly to its relevant task in Linear.
What happens on PR
Each PR in our workflow is guided by a comprehensive PR template. This template serves as a checklist, reminding us of critical tasks and best practices:
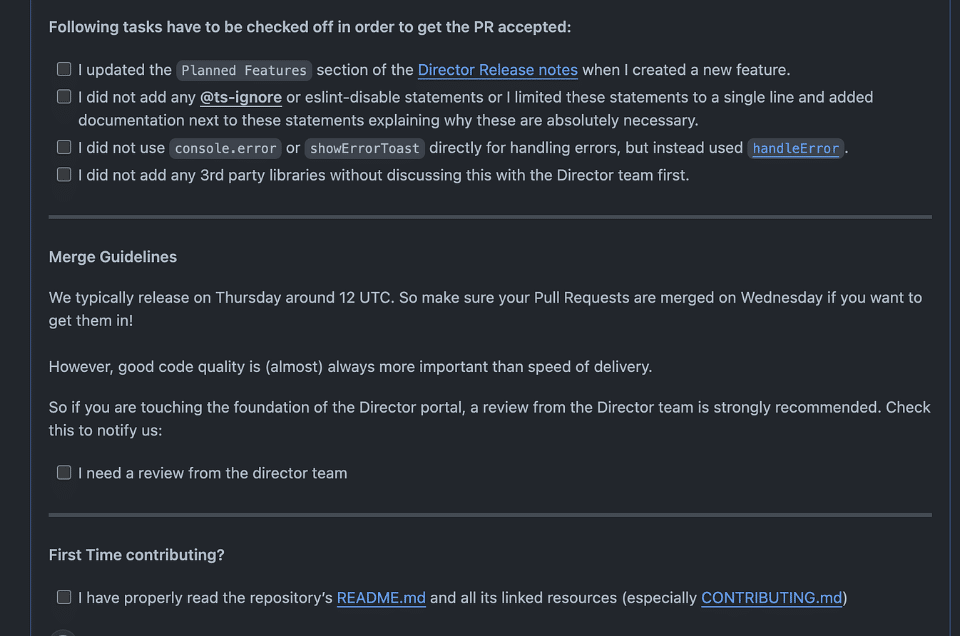
Auto generated text for each PR
- Update Weekly Release Notes: The first item reminds us to update the release notes weekly. This is crucial for our Project Managers (PMs) and Customer Success Managers (CSMs) who use these notes to stay informed about the latest changes.
- Avoid Using @ts-ignore: The second checkbox makes sure we didn’t add any @ts-ignore inside of the code.
- Use Centralized Error Handling: It’s essential to handle errors, especially in API requests, using our centralized handleError function. This approach adds a correlation ID to each error, making it easier to track issues in Datadog.
- Scrutinize Third-Party Libraries: For anyone outside the Director team (responsible for the overall health of the FE codebase), this checkbox emphasizes the need to double-check whether adding a new third-party library is necessary.
- Notify Director Engineers on Slack: Once checked, this triggers a notification in our Slack channel, alerting all Director engineers about the new PR.
- Guidance for First-Time Contributors: We also include links to documentation specifically tailored for first-time contributors, ensuring they have all the necessary information to make meaningful contributions.
What happens On Release
The release process for Director is managed by our Quality Assurance (QA) team, ensuring that each release meets our high standards. Here’s how the process unfolds:
- Pre-Release Sync: Prior to the release, our team holds a quick meeting to discuss and identify any open PRs that need to be merged before the release.
- Triggering the Release Workflow: After merging the required PRs, the QA team initiates a specific GitHub workflow. This workflow is responsible for updating the CDN proxy for our staging cluster, as outlined in the deployment strategy section above.
- Testing on Staging Environment: The updated staging environment undergoes rigorous testing. This includes both manual checks and automated (E2E) tests. The focus here is to ensure that everything works as expected before proceeding to the production environment.
- Updating Production and Final Testing: After successfully passing the staging tests, we update the production CDN proxy. Following this, both manual and automated E2E tests are performed in the production environment.
This structured approach, led by our QA team, guarantees that each release of Director is robust, reliable, and ready for deployment to our users.
Code Generation
In our development process, Protocol Buffers play a critical role as our interface definition language. Here’s an overview of how we handle code generation:
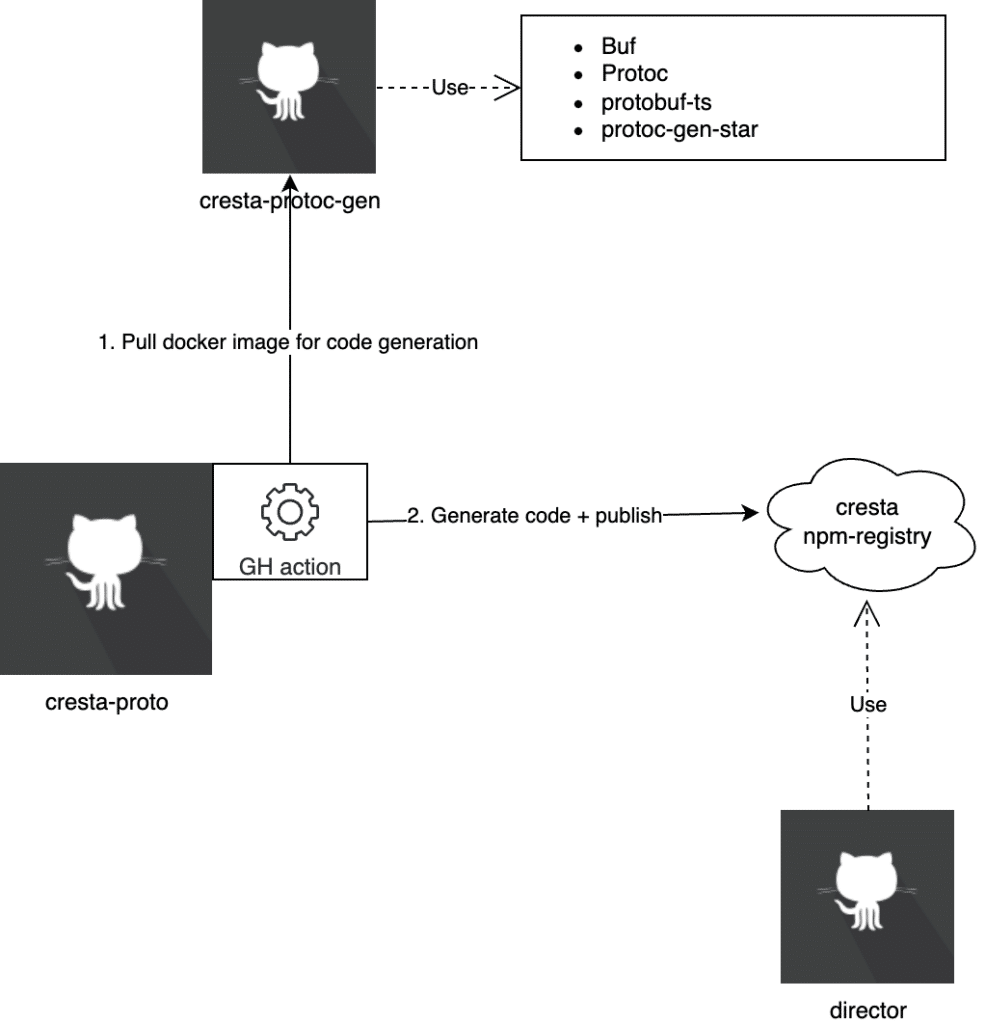
Overview of the code generation process at Cresta
1: PR Merge in “cresta-proto” Repository:
- Our ‘protos’ are stored in a repository named “cresta-proto”. Whenever a PR is merged into the main branch of this repository, it triggers our code generation process.
2: CI Workflow Activation:
- This merge initiates a GitHub workflow. The workflow’s job is to generate all the source code from our Protocol Buffers, covering languages like TypeScript, Python, and Go. During this phase, we use mage to help us coordinate the process.
3: Executing the Mage Script:
- The mage script uses a Docker image, which is based on a Dockerfile located in the ‘cresta-protoc-gen’ repository. This Docker image contains all the dependencies necessary for running ‘protoc’, the Protocol Buffers compiler. Notable dependencies include ‘buf’, ‘protoc-gen-star’, and ‘protobuf-ts’.
4: Deployment to npm Registry:
- After the successful execution of the above steps, the newly generated package, @cresta/web-client, is deployed to our npm registry.
- This package is then integrated as a dependency within the “director” codebase.
Conclusion
As we stand today, I’d say that our FE repository is in a robust state. We’ve established strict linting rules, our infrastructure operates smoothly, and the FE tooling we’ve implemented is both fast and efficient. This combination allows us to execute our tasks with speed and precision.
However, echoing the wisdom of Socrates, “I know that I know nothing”, I acknowledge that there’s always room for growth and improvement. The tech landscape is ever-evolving, and so are the best practices within it. I believe there’s always something new to learn and ways to enhance our processes.
I welcome any thoughts, suggestions, or insights you might have regarding this article on Cresta’s front-end development. If you’re curious to learn more about Cresta or wish to share your perspective, please feel free to reach out. Engaging with the community is not just about sharing knowledge; it’s also about learning from others and evolving together.
Originally posted on Medium.